Hi stampers! I know I'm still a bit quiet. It's a lot of work preparing and cutting all the elements for the mini album class I'm doing that is going out this week. I'm so blessed to have so many of you sign up, but boy is it a lot of cutting :) Anyway, I didn't get a chance to do a video on this month's Paper Pumpkin kit but it is oh so cute! And, if you sign up for Paper Pumpkin now, you can actually buy this kit, there are still some left! Click HERE to sign up!
Huge Hugs,
Christine
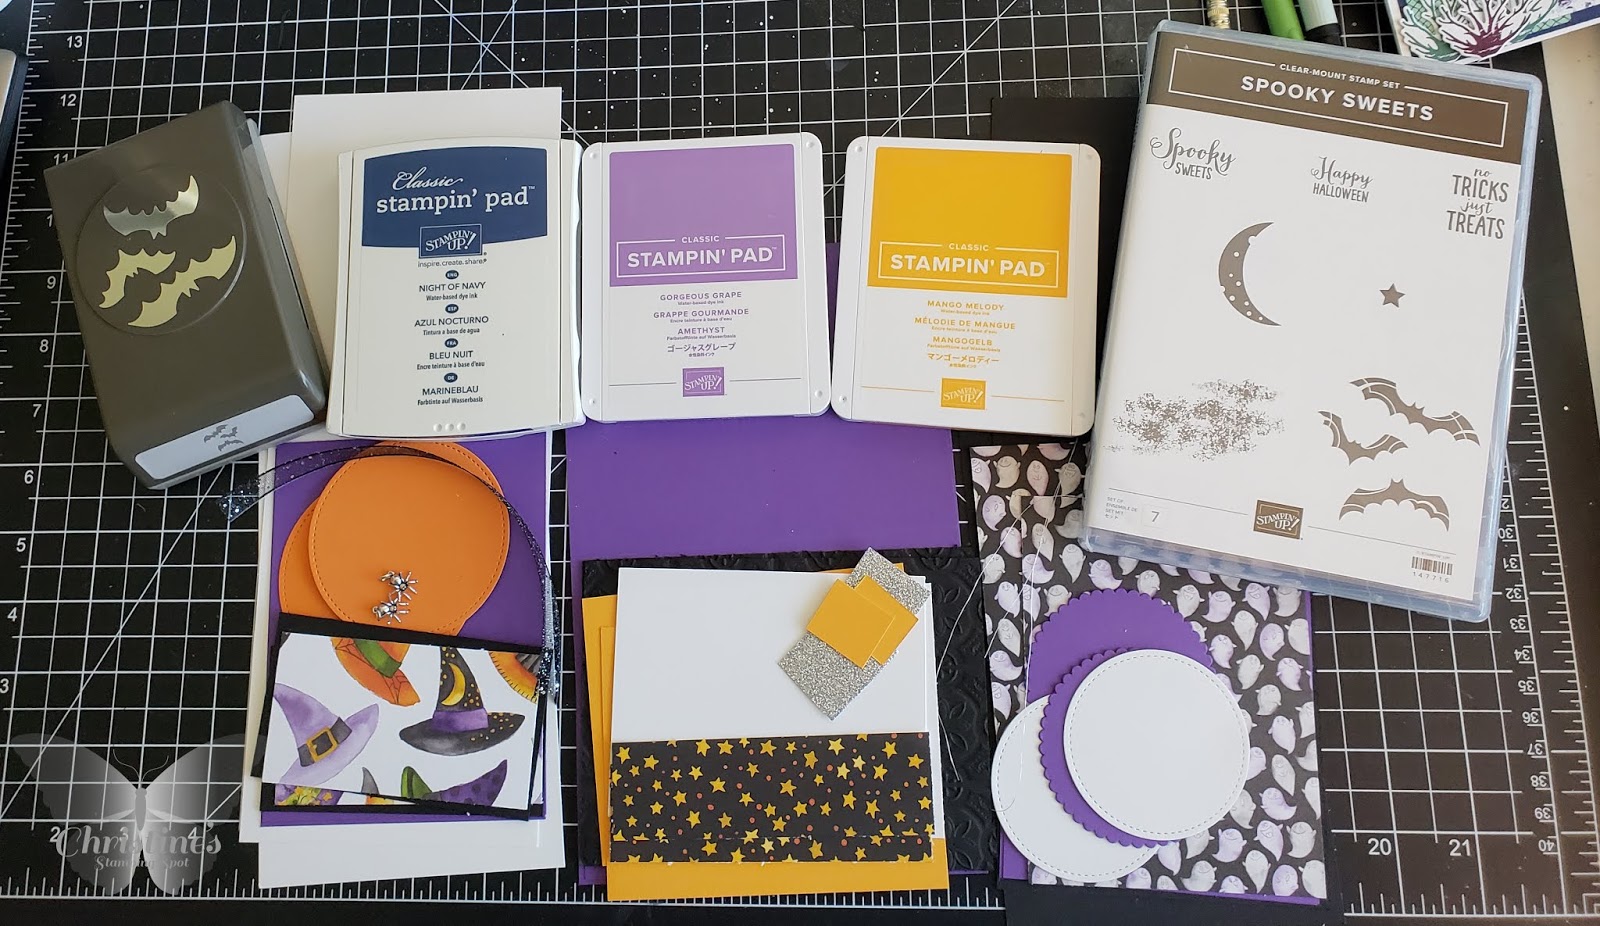
Hi everyone! I'm so excited to introduce my next online class to you. The way my online classes will work is that if you decide you want to join the class, you will email me at christinemriley@gmail.com to sign up for the class. I will invoice you and you will send payment via PayPal for the supplies (only the catalog items, in this case, the Spooky Sweets bundle and the Night of Navy, Gorgeous Grape, and Mango Melody ink pads). You will then receive from me for free with your order all of the supplies needed to create 6 cards, two each of three designs, as well as six Whisper White envelopes. You can see the free supplies you will be getting in the video above. I need you to please email me by noon EST on Monday, September 24, 2018 if you want to take the class. That way, I can place the order with Stampin Up, and then create your class packets and get everything shipped to you. I will ship the class items to you the week of October 1, 2018. The total cost of this class is $58.95 for the bundle and ink pads (this is the exact cost from the catalog) plus $5 shipping for me to ship the products and class materials to you for a grand total of $63.95. If you would like to make any substitutions (for example, if you already own the Night of Navy ink pad and would like a different ink pad, or different product altogether, instead) or if you would like to add to your order, simply let me know that in the email you send signing up for the class. Along with the products and class materials, you will also get access to an exclusive class video wherein I will teach you step by step how to create the six cards. I will also provide you with an instruction sheet which will explain step by step how to create the six cards. You can also add to your order if you like, just email me what you'd like to add and I'll place the order for you once you PayPal me the cost of the order. **If you are already a demonstrator but you are interested in the videos for this class, for $15, you will get access to the video, the class materials and an email copy of the instruction sheet. Just send me an email at christinemriley@gmail.com if you would like to utilize this option. Thanks so much, I think you will really love this class!!! :) Hugs!
Hugs,
Christine
Hi everyone! For today's card, I just had to ink up the super cute Spooky Sweets stamp set from the new 2018 Stampin' Up holiday catalog. You can purchase the stamp set and coordinating punch separately if you like, but if you purchase them together as a bundle, you get 10% off. Here are my cards:
To create this card, I started with a piece of Whisper White cardstock cut at 4 1/4" by 3 1/4". I stamped the tree using the Sheltering Tree stamp set and Memento Tuxedo Black ink. I then sponged my night sky scene using Night of Navy and Gorgeous Grape inks and sponges. I then used the textures stamp from the stamp set and added some texture to the sky by stamping it a few times with Memento Tuxedo Black ink. Next, I cut a piece of Gorgeous Grape cardstock for my card base at 8 1/2" by 5 1/2", scored at 4 1/4". I then cut a piece of designer paper from the Toil and Trouble DSP (measuring 5 1/4" by 4"). I then layered the sponged panel onto a piece of Mango Melody cardstock (measuring 4 12" by 3 1/2"). Next, on some scrap Whisper White cardstock, I stamped my bats with Memento Tuxedo Black ink. I then stamped my moon with Mango Melody. The stars and moon from this stamp set coordinate with the Twinkle Builder punch from the Annual Catalog so I punched my stamped moon out with that punch, and then punched uout some stars from Mango Melody cardstock. Next, I adhered my moon and stars down to my inked panel with some glue. I also cut a black spooky fence using the Farmhouse Framelit dies from the Holiday Catalog and glued that down to the panel. I then added my bats with mini dimensionals. I the adhered the panel to the card front with dimensionals. Finally, I stamped my sentiment with Memento Tuxedo Black ink onto a small piece of Mango Melody cardstock and adhered it with dimensionals. For a finishing touch, I added a beautiful Black Glittered Organdy Ribbon from the Holiday Catalog to tie a bow along the top of the card base and adhered a mini glue dot to the center of the bow so it wouldn't slide around. What do you think?
I'll be doing my next online card class with this bundle so make sure to check the blog post right after this one for all the information on that class. Thanks so much as always for stopping by. I'll have a link to all the products I used to create this card below. Hugs!
Hugs, Christine
Hi everyone! For today's card and video tutorial, I just had to paly with the Spirited Snowmen stamp set again, which is new from Stampin' Up in the 2018 Holiday Catalog. I also used the new Buffalo Check background stamp as well. Here's today's card:
To create today's card, I stamped my cute snowman onto Thick Whisper White cardstock with Memento Tuxedo Black ink and then cut it out with a stitched circle from our Stitched Shapes Framelits dies set. I then colored the cute snowman with the following Stampin' Blends: Light Smokey Slate, Color Lifter, Lovely Lipstick Combo, Bermuda Bay Combo, Pumpkin Pie Combo, Soft Suede Combo, and Dark Basic Black. I then set that aside and cut a piece of Coastal Cabana cardstock to 3 3/4" by 5". I then used some repositionable adhesive to adhere it down to a piece of grid paper/scratch paper I placed inside my Stamparatus. I then layered the Buffalo Check background stamp over the cardstock until it was straight, then shut the Stamparatus lid so it would stick to the lid of the stamparatus. I then inked the stamp with Early Espresso ink and stamped it onto the Coastal Cabana Cardstock. By using the Stamparatus, I could do this as many times as I needed to to get a perfect, beautiful image.
Next, I cut a card base out of Coastal Cabana cardstock (standard A2 sized card base measuring 11" by 4 1/4", scored at 5 1/2"). I cut a piece of Early Espresso to 4" by 5 1/4" and adhered it to the card base and then adhered the Buffalo Check panel on top of that. I cut a scalloped circle from our Layering Circles Framelit dies out of Bermuda Bay cardstock and adhered our snowman circle to that. I then added some dimensionals on the back and then wound some silver metallic thread along the back. I then adhered the circle panel to the card front. I cut a small strip of Coastal Cabana cardstock and stamped my sentiment with Bermuda Bay ink. I then used my Banner Triple Punch to create the banner end. I layered a piece of Silver Glimmer paper underneath the sentiment panel, also using the Banner Triple Punch to create a banner end, and then adhered the sentiment panel with dimensionals to the card front. Next I cut a piece of 5/8" Burlap Ribbon and tied a double knot along the top of the card front. For a finishing touch, I added five silver metallic pearls. What do you think?
Well, that's it from me today. I hope you enjoyed today's card and video tutorial. Links for all the products used to create today's card can be found below and you can shop in my store any time, 24/7. Thanks so much as always for stopping by! Hugs
Hi everyone! I'm so excited to introduce my next online class to you. The way my online classes will work is that if you decide you want to join the class, you will email me at christinemriley@gmail.com to sign up for the class. I will invoice you and you will send payment via PayPal for the supplies (only the catalog items, in this case, the Dashing Deer bundle and the Early Espresso and Soft Suede ink pads). You will then receive from me for free with your order all of the supplies needed to create 6 cards, two each of three designs, as well as six Whisper White envelopes. You can see the free supplies you will be getting in the video above. I need you to please email me by noon EST on Monday, September 17, 2018 if you want to take the class. That way, I can place the order with Stampin Up, and then create your class packets and get everything shipped to you. I will ship the class items to you the week of September 24, 2018. The total cost of this class is $76.20 for the bundle and ink pads (this is the exact cost from the catalog) plus $5 shipping for me to ship the products and class materials to you for a grand total of $81.20. I have an upgrade option as well: if you would like to add the Delicate Lace Edgelits, which were used on all the class card designs, you would pay an additional $29 for a grand total of $110.20. If you would like to make any substitutions (for example, if you already own the Early Espresso ink pad and would like a different ink pad instead) or if you would like to add to your order, simply let me know that in the email you send signing up for the class. Along with the products and class materials, you will also get access to an exclusive class video wherein I will teach you step by step how to create the six cards. I will also provide you with an instruction sheet which will explain step by step how to create the six cards. You can also add to your order if you like, just email me what you'd like to add and I'll place the order for you once you PayPal me the cost of the order.
**If you are already a demonstrator but you are interested in the videos for this class, for $15, you will get access to the video, the class materials and an email copy of the instruction sheet. Just send me an email at christinemriley@gmail.com if you would like to utilize this option. Thanks so much, I think you will really love this class!!! :) Hugs!
Hugs, Christine
Hi everyone! I just had to get out the new Spirited Snowmen stamp set from Stampin' Up's new Holiday Catalog and start playing with it. This stamp set is absolutely adorable and I had so much fun making today's card. Here are some pictures:
To begin working on today's card, I first started with a piece of Thick Whisper White cardstock cut to 4 1/4" by 3 1/4". I chose Thick Whisper White because I was going to be coloring the snowmen with my Stampin' Blends and I find I get better blending on the thick paper. I cut two little hillsides from White Glimmer paper using the hillside die from the In the Woods Framelit Die Set (stay tuned for videos using this gorgeous bundle soon!!) I placed (without adhering) my hillsides down on my Thick Whisper White cardstock and drew a little pencil mark where I wanted the bottom of my snowmen couple to be stamped, then removed the hillsides. Next, I stamped the snowman couple with Memento Tuxedo Black ink onto the thick Whisper White panel. I then created a mask to cover the snow couple so I could ink the background. To create my mask, I simply stamped the image on a post it note and then cut it out and stuck it on top to cover my snow couple. To ink the background, I used Lovely Lipstick, Blackberry Bliss, Night of Navy, and Memento Tuxedo Black ink. I used my Stampin' Sponges and just kept blending the inks onto top of each other until I got the results I wanted. I then, still keeping my mask on the snowmen, got a cheap paint brush and the new Frost White shimmer paint and flicked some of the paint onto the inked background so it would look like snow or stars. I set this panel aside to let the shimmer paint dry.
Next, I cut out a piece of Blackberry Bliss cardstock to 5 1/4" by 4" and then ran it through my Big Shot with the new Swirls and Curls textured impressions embossing folder from the Holiday Catalog. I then took a sponge dauber and added some Frost White Shimmer Paint to the cardstock panel and set it aside to dry. Next, I colored my snowmen couple with the following Stampin' Blends (which are our amazing alcohol markers): Light Smoky Slate, Color Lifter, Lovely Lipstick Combo, Cherry Cobbler Combo, Night of Navy combo, Basic Black combo, and Shaded Spruce combo. I then lightly spritzed some White Shimmer Paint onto the snowmen panel using my Spritzer bottle, which I filled 80% with rubbing alcohol and 10% White Shimmer Paint. Next I let that dry and then adhered my snowmen panel to a piece of Lovely Lipstick cardstock cut at 4 1/2" by 3 1/2". I then adhered my Blackberry Bliss panel to a Black card base which measures 8 1/2" by 5 1/2" scored at 4 1/4". I then adhered my snowmen panel with dimensionals. Finally, I stamped my sentiment with Memento Tuxedo Black ink on a strip of Lovely Lipstick cardstock and then used my Banner Triple Punch to cut the banner end off. I then adhered the sentiment panel with some mini dimensionals. What do you think?
Whew! Well, there sure were a lot of techniques used in today's card, but none of them are hard and I sure hope you enjoyed today's video. I will link below all of the products used to make this card so make sure to check that out and click on the links if you'd like to purchase anything. Thanks so much for stopping by and for your business.
Huge Hugs,
Christine
Hi everyone! For today's card, I just had to color up the adorable witch from the new Cauldron Bubble stamp set. Here's the card I made:
To create today's card, I first stamped the witch and the broom in Memento Tuxedo Black ink onto Thick Whisper White cardstock. I then colored the witch with the following Stampin' Blends markers (which are alcohol markers): Basic Black Combo, Highland Heather Combo, Mango Melody Combo, Granny Apple Green Combo, Soft Suede Combo, Petal Pink Combo, and Dark Daffodil Delight. For the broom, I used the Soft Suede Combo and Dark Daffodil Delight. I show in detail in the video how I used the markers to create a fun shaded effect.
Next, I cut a piece of the new Black Foil Paper to 5 1/4" by 4" and then ran it through the Big Shot using the new Tin Tile Textured Impressions Embossing Folder. I then added some shimmer to this panel using a sponge dauber and the new Champagne Mist Shimmer Paste. I then cut out a stitched oval using my Stitched Shapes framelit dies and a silver oval from silver glimmer paper using our Layering Ovals framelit dies. I adhered these ovals together using mini glue dots, and then popped my witch and broom (after cutting them out with the coordinating dies) with dimensionals and mini dimensionals. I cut a card base from Gorgeous Grape cardstock (measuring 8 1/2" by 5 1/2" scored at 4 1/4) and a placed a piece of Whisper White cardstock inside to write my message (this measures 5 1/4" by 4". I then adhered the black foil panel to the card front. Next, I cut a strip of star DSP from the Toil and Trouble DSP paper stack to 4" by 1 1/2" . I cut a piece of Pumpkin Cardstock to 4" by 1 3/4" and mounted the DSP to that and then adhered the panel to the card front. I adhered my ovals with my witch and broom to the card front using dimensionals. I stamped my sentiment with Memento Tuxedo Black ink onto Gorgeous Grape cardstock (cut at 2 1/4" by 3/4" and then cut a banner edge using my Triple Banner Punch. I then wound a bunch of Silver Metallic Thread behind the sentiment panel and stuck it to dimensionals and then stuck it to the cardstock. Next, I tied a beautiful bow along the top of the card using the new Black Glittered Organdy Ribbon. I then used a piece of Black Baker's Twine to attach a Spider Trinket to the bow. What do you think?
I really loved putting this card together and working with Stampin' Up's alcohol markers. They blend beautifully. Don't forget, I'm doing an online card class using this bundle and you have until noon on Monday, September 10 to register. All details on the class can be found HERE.
That's it from me today. Thanks so much as always for stopping by. I'll link below all the products I used to create this fun card. Thank you for your business and support :)
Hugs,
Christine
Hi everyone! It's September 5 so that means the 2018 Stampin' Up Holiday Catalog is live! I wanted to do a quick walk through of the inside of the catalog. If you have ordered from me, you should have received or will be receiving soon your free catalog. If you have not ordered from me, but would like a paper copy of the catalog, please email me at christinemriley@gmail.com and I'm happy to send you one in the mail for free. You can also view the Holiday Catalog in PDF format online. Click HEREor click HEREand then click on "Catalogs." To shop any time, 24/7, head HERE. Enjoy! This new catalog is AMAZING! :):):) Hugs, Christine My Blog: http://christinestampingspot.blogspot.com/
Hi everyone! I'm so excited to introduce my next online class to you. The way my online classes will work is that if you decide you want to join the class, you will email me at christinemriley@gmail.com to sign up for the class. I will invoice you and you will send payment via PayPal for the supplies (only the catalog items, in this case, just the Cauldron Bubble bundle). ***You will want to have your own Memento Tuxedo Black ink pad. If you would like to add this to your order, let me know in your email registering for the class. ***Also, one of the cards will be a class on coloring with Stampin' Write Markers. I'm not requiring that you purchase them for the class, but if you want to, these are the colors I used: Soft Suede Combo, Petal Pink combo, Highland Heather Combo, Basic Black combo, Mango Melody combo, Granny Apple Green Combo, Dark Daffodil Delight. If you want to add any of these alcohol markers to your order, just let me know in your email.
In exchange for purchasing the bundle (and anything else you may want to add), you will then receive from me for free with your order all of the supplies needed to create 6 cards, two each of three designs. You can see the free supplies you will be getting in the video above. I need you to please email me by noon EST on Monday, September 10, 2018 if you want to take the class. That way, I can place the order with Stampin Up, and then create your class packets and get everything shipped to you. I will ship the class items to you the week of September 17, 2018. The total cost of this class is $54.95 for the bundle (this is the exact cost from the catalog) plus $5 shipping for me to ship the products and class materials to you for a grand total of $59.95. If you would like to add to your order, simply let me know that in the email you send signing up for the class.
**If you are already a demonstrator but you are interested in the videos for this class, for $15, you will get access to the video, the class materials and an email copy of the instruction sheet. Just send me an email at christinemriley@gmail.com if you would like to utilize this option. Thanks so much, I think you will really love this class!!! :) Hugs!
Hugs, Christine
Hi stampers! I'm so excited to introduce my next online class to you. This is a special online class. Instead of making cards, we will be making a mini album using Stampin' Up products. We will go over step by step how to make this entire mini album from start to finish. The video above shows off the complete mini album we'll be making, but here are some pictures:
The way my online classes will work is that if you decide you want to join the class, you will email me at christinemriley@gmail.com to sign up for the class. I will invoice you and you will send payment via PayPal for the supplies (only the catalog items, in this case, the Signs of Santa Bundle, the Santa's Workshop Memories and More pack, and two packs of the Santa's Workshop designer series paper). ***You will want to have your own Memento Tuxedo Black ink pad, a Crumb Cake ink pad, and some Stampin' Blends to color the stamped images, if you would like to add any of those items to your order, just let me know in your email. You'll also need your own adhesive (I recommend Snail or Tombow and Tear and Tape). You will then receive from me for free with your order all of the supplies needed to create the mini album seen in this video. That's right! Everything you need to create this album (minus adhesive, you will need your own adhesive, I recommend Snail and Tear and Tape). You can see the free supplies you will be getting in the video above. I need you to please email me by noon EST on Friday, September 7, 2018 if you want to take the class (this is a short window time frame because these products will be very popular and I don't want them to go on backorder). That way, I can place the order with Stampin Up, and then create your class packets and get everything shipped to you. I will ship the class items to you the week of September 24, 2018. The total cost of this class is $85.50 for the bundle, the Memories and More pack, and the two packs of Santa's Workshop designer series paper (this is the exact cost from the catalog) plus $8 shipping for me to ship the products and class materials to you for a grand total of $93.50 If you would like to make any substitutions or if you would like to add to your order, simply let me know that in the email you send signing up for the class. If you would like to add more to your order, just let me know in your email signing up for this class. Along with the products and class materials, you will also get access to an exclusive class video (this will be broken up into multiple class videos) wherein I will teach you step by step how to create the entire mini album from start to finish. I will also provide you with an instruction sheet which will show step by step how to create the album. You can also add to your order if you like, just email me what you'd like to add and I'll place the order for you once you PayPal me the cost of the order. **If you are already a demonstrator but you are interested in the videos for this class, for $35, you will get access to the video, the class materials and an email copy of the instruction sheet. Just send me an email at christinemriley@gmail.com if you would like to utilize this option. Thanks so much, I think you will really love this class!!! :) Hugs!
Hugs, Christine
Hi everyone! For today's card, I decided to play with a bunch of new products from the brand new 2018 Stampin' Up Holiday Catalog. Don't forget, the catalog goes live on September 5th so mark the date on your calendar so you can get your orders in :) Here are some pictures of today's card:
For today's card, I used the new Country Home stamp set from Stampin' Up. This is a two step stamping stamp set, which you guys know I love :) I stamped the image on a piece of Thick Whisper White cardstock (I find Thick Whisper White is best for coloring with Stampin' Write markers) which measures 2 1/4 by 4". I colored the image with my Stampin' Blends using the following colors (the video goes into great detail on how to use these awesome alcohol markers!): Light Smoky Slate, Dark Smoky Slate, Light Blackberry Bliss, Dark Blackberry Bliss, Light Old Olive, Dark Old Olive, and Light Cajun Craze and Dark Cajun Craze. I also used the color lifter marker to erase any coloring outside of the lines mistakes. I mounted the coloring panel onto a piece of Basic Gray cardstock that measures 2 1/2" by 4 1/4". I the cut a piece of Blackberry Bliss cardstock to 4" by 5 1/4" and ran it through my Big Shot with the new Tin Tile Dynamic Textures Impressions Embossing Folder. I then got a sponge dauber and my new Champagne Mist shimmer paint and lightly daubed the paint onto the embossed cardstock. I then adhered that to a Basic Gray card base measuring 11" by 4 1/4", scored at 5 1/2". I then added some of the brand new chicken wire to either side of the colored panel and then popped the panel with dimensionals. Finally, for a finishing touch, I added a beautiful bow using the Whisper White and silver ribbon. What do you think?
Well, that's it from me today. I'll link below to all of the products used to create this card. Don't forget, you can begin ordering from the Holiday Catalog on September 5th and you can use your Bonus Bucks earned during the month of August at any time during the month of September. Happy shopping! :)
Hugs,
Christine