Hi everyone! I'm so excited to introduce my next online class to you. The way my online classes will work is that if you decide you want to join the class, you will email me at christinemriley@gmail.com to sign up for the class. I will invoice you and you will send payment via PayPal for the supplies (only the catalog items, in this case, the Sea of Textures Bundle and the Tranquil Tide and Blackberry Bliss ink pads). You will then receive from me for free with your order all of the supplies needed to create 6 cards, two each of three designs. You can see the free supplies you will be getting in the video above. I need you to please email me by noon EST on Monday, September 3, 2018 if you want to take the class. That way, I can place the order with Stampin Up, and then create your class packets and get everything shipped to you. I will ship the class items to you the week of September 10, 2018. The total cost of this class is $70.07 for the bundle and ink pads (this is the exact cost from the catalog) plus $5 shipping for me to ship the products and class materials to you for a grand total of $75.07. If you would like to make any substitutions (for example, if you already own the Tranquil Tide ink pad and would like a different ink pad instead) or if you would like to add to your order, simply let me know that in the email you send signing up for the class.
Also, don't forget, for the entire month of August, Stampin' Up is doing Bonus Days. For every $50 you spend, you get $5 in free money ("Bonus Bucks") to spend during the month of September. There is no limit to the number of Bonus Bucks you can receive. If you would like to add more to your order, just let me know in your email signing up for this class. Along with the products and class materials, you will also get access to an exclusive class video wherein I will teach you step by step how to create the six cards. I will also provide you with an instruction sheet which will explain step by step how to create the six cards. You can also add to your order if you like, just email me what you'd like to add and I'll place the order for you once you PayPal me the cost of the order.
**If you are already a demonstrator but you are interested in the videos for this class, for $15, you will get access to the video, the class materials and an email copy of the instruction sheet. Just send me an email at christinemriley@gmail.com if you would like to utilize this option. Thanks so much, I think you will really love this class!!! :) Hugs!
Hi everyone! I hope you are all having a wonderful weekend! I can't believe how quickly the weekends go by. We've had a good one, the weather is beautiful here. Anyway, for my video and card today, I had to play some more with the Beautiful Promenade bundle from Stampin' Up. Here are some pictures of my card:
For today's card, I first stamped the inside layer of the stamp from the Beautiful Promenade stamp set in Coastal Cabana ink onto a scrap piece of Whisper White cardstock. I then used my embossing buddy and swiped it over the part of the cardstock where I stamped the inside of the flower. I then stamped the outer image of the flower with Versamark ink and then sprinkled copper embossing powder over the image. I melted the embossing powder with my heat tool and voila! You get a beautiful embossed image. It's so pretty in person! Next, I stamped the small floral cluster in Berry Burst ink. I then cut both flowers out with their coordinating dies from the Beautiful Layers thinlits die set. Next, I cut a piece of copper foil paper into 1 1/2" by 4" and ran it through my Big Shot using my Garden Trellis textured impressions embossing folder. I then adhered the strip of copper paper to a piece of Berry Burst cardstock measuring 4" by 5 1/4" and then adhered that to a Coastal Cabana cardstock card base measuring 11" by 4 1/4", scored at 5 1/2". I next cut a piece of Coastal Cabana cardstock into a beautiful stitched shape using the limited edition Stitched Seasons dies (which are only available, while supplies last, for the month of August, so make sure to pick it up (and the coordinating stamp set) as soon as possible if you're interested. I stamped another floral image from the stamp set around the stitched panel in Coastal Cabana ink for a subtle tone on tone look. I then adhered the stitched panel to the card front with dimensionals. Next, I used a piece of copper glitter paper (which will be available September 5 when the Holiday Catalog goes live) with the beautiful die from the Beautiful Layers Thinlits die set (the Big Shot sandwich you want is the Big Shot Platform, Thin Die Adaptor, Precision Base platform, cardstock, die face down, cutting plate). Then I used my Die Brush to get all the pieces out of the die. It comes out perfectly. I adhered the glitter die cut to the bottom left corner with dimensionals. I then cut out some leaves from Shaded Spruce cardstock using the Beautiful Layers dies, and then adhered them to the back of my Coastal Cabana and copper embossed flower with mini glue dots and then adhered the flower to the top of the glimmer paper with dimensionals. I adhered the small stamped Berry Burst flower cluster to the bottom right hand corner with dimensionals. Finally, I stamped my sentiment with Memento Tuxedo Black ink onto Berry Burst cardstock and then cut the banner end with my Triple Banner punch. I added dimensionals to the back of the sentiment panel and then wound some copper metallic thread along the back, and then adhered the panel to the card front. For a finishing touch (and I forgot to do this in the video), I added three pearls to the top left hand corner. What do you think?
Don't forget, I'm doing an online card class using this bundle and there are still spots open! You must register by tomorrow (Monday, August 27th). Check out this video here for all the information:
And below is a picture of all the goodies you get in this class! To register, please email me at christinemriley@gmail.com. I'd love to have you in class :)
Also, don't forget about Bonus Days:
Finally, don't forget about Bonus Days! The month of August is almost over! For every $50 you spend in August, you get $5 in free Bonus Bucks you can redeem in September (when the new Holiday Catalog comes out!) There is no limit to the amount of Bonus Bucks you can earn, so get shopping :)
Thanks so much as always for stopping by. I'll have a link below to all of the products used to make today's card. Have a wonderful day! Hugs!
Hugs,
Christine
Hi everyone! In today's video I share this month's Paper Pumpkin kit with you guys and even give you a little peek at next month's kit as well :) Here are some pictures from this month's gorgeous kit:
How gorgeous are these cards?!?! And as you can tell from the video, they are so super easy to put together. To subscribe to Paper Pumpkin (and remember, you can buy one month at a time and opt out any time you wish), click HERE. Thanks so much for stopping by! :) Hugs!
Hi everyone! I'm so excited to introduce my next online class to you. The way my online classes will work is that if you decide you want to join the class, you will email me at christinemriley@gmail.com to sign up for the class. I will invoice you and you will send payment via PayPal for the supplies (only the catalog items, in this case, the Beautiful Promenade Bundle and the Melon Mambo, Petal Pink, and Mossy Meadow ink pads). You will then receive from me for free with your order all of the supplies needed to create 6 cards, two each of three designs. You can see the free supplies you will be getting in the video above. I need you to please email me by noon EST on Monday, August 27, 2018 if you want to take the class. That way, I can place the order with Stampin Up, and then create your class packets and get everything shipped to you. I will ship the class items to you the week of September 3, 2018. The total cost of this class is $74.45 for the bundle and ink pads (this is the exact cost from the catalog) plus $5 shipping for me to ship the products and class materials to you for a grand total of $79.45 If you would like to make any substitutions (for example, if you already own the Melon Mambo ink pad and would like a different ink pad instead) or if you would like to add to your order, simply let me know that in the email you send signing up for the class.
Also, don't forget, for the entire month of August, Stampin' Up is doing Bonus Days. For every $50 you spend, you get $5 in free money ("Bonus Bucks") to spend during the month of September. There is no limit to the number of Bonus Bucks you can receive. If you would like to add more to your order, just let me know in your email signing up for this class. Along with the products and class materials, you will also get access to an exclusive class video wherein I will teach you step by step how to create the six cards. I will also provide you with an instruction sheet which will show step by step how to create the six cards. You can also add to your order if you like, just email me what you'd like to add and I'll place the order for you once you PayPal me the cost of the order.
***If you are already a demonstrator but you are interested in the videos for this class, for $15, you will get access to the video, the class materials and an email copy of the instruction sheet. Just send me an email at christinemriley@gmail.com if you would like to utilize this option. Thanks so much, I think you will really love this class!!! :) Hugs!
Hugs, Christine
Hi everyone! In this video, I share with you how I will be doing my paper share for the 2018 Stampin' Up Holiday Catalog. What is a paper share? Well, I thought it might be fun for you all to be able to see a sampling of all of the designer series paper and specialty paper available in the holiday catalog so you can see the prints up close and in person. The paper packs are at least $11 for most of them so it can be costly. This way, you will get a sampling of every single paper available in this holiday catalog. You'll get two sheets of each design available in the catalog. And, you get all of this for $30, including shipping!!!! That's a great deal!!! To sign up, simply email me at christinemriley@gmail.com with "Holiday Catalog Paper Share" in the subject line and let me know you'd like to purchase. I'll invoice you the $30 through PayPal. I think you guys will really like this new feature so I hope you sign up! Hugs! :)
Hi stampers! In today's video, I just had to share how I created this super fun thank you card using the animal outing bundle. I just love this bundle and I love coloring these images with my Stampin' Blends (which are alcohol based markers, you can liken them to copics, but they are, in my humble opinion, even more awesome and even easier to use). In the video, I also share in depth how to use the Stampin' Blends to color this sweet image. Here are some pictures of my card:
To create this card, I first stamped my rhino onto Thick Whisper White cardstock (my preferred cardstock for coloring with Stampin' Blends) with Memento Tuxedo Black ink. I colored the rhino with Dark Smokey Slate and Light Smokey Slate Blend markers. I colored the bird with Dark Lovely Lipstick and Light Lovely Lipstick, I colored the horn with Ivory and my Color Lifter marker, and I colored the grass with Dark Old Olive and Light Old Olive. Next, I cut the rhino out with the coordinating dies. Next, I created card base out of Lovely Lipstick cardstock (cut at 4 1/4" by 11", scored at 5 1/2"). I placed a piece of Whisper White cardstock (cut at 4" by 5 1/4") inside the card base for a place to write a message. Next, I cut a piece of DSP from the Animal Expedition DSP. I cut a strop of Old Olive cardstock to 4" by 1 1/2 and adhered it to the DSP a little ways up from the bottom. I then adhered some Burlap Ribbon around the piece of Old Olive cardstock and adhered it to the back of the DSP and then adhered the entire DSP panel to the Lovely Lipstick card base. Next, I cut out two circles with the centers missing by putting two stitched circles from the Stitched Shapes fremelit dies (one slightly larger than the other) nested together on top of my paper into my Big Shot. I did this with Basic Gray cardstock and Old Olive. I then cut a sold stitched circle using the same larger circle die out of lovely Lipstick. I used my fine tip glue pen to glue the circle rings onto the card front. I the popped the Lovely Lipstick stitched circle with Dimensionals. Next I cut some greenery from the coordinating Animal Friends Framelit Die set and clued them to the card front with my fine tip glue pen. I then popped my rhino onto the Lovely Lipstick stitched circle with dimensionals. I stamped my sentiment in Lovely Lipstick ink onto Basic Gray cardstock and then backed it with Lovely Lipstick cardstock and then adhered the sentiment panel to the card front with dimensionals. For a finishing touch, I added some Silver Metallic Pearls. What do you think?
Don't forget, I'm doing an online card class with this bundle and sign ups are open through tomorrow so make sure to check out This Blog Post for all the information on the class. Thanks so much as always for stopping by. I'll link below to all the products I used to create this card. Remember, you can shop my online store any time, 24/7. Thanks again and have a wonderful day!
Hugs, Christine
Hi everyone! I'm so excited to introduce my next online class to you. The way my online classes will work is that if you decide you want to join the class, you will email me at christinemriley@gmail.com to sign up for the class. You will send payment via PayPal for the supplies (only the catalog items, in this case, the Animal Outing Bundle and the Early Espresso ink pad). You will then receive from me for free with your order all of the supplies needed to create 6 cards, two each of three designs. You can see the free supplies you will be getting in the video above. I need you to please email me by noon EST on Monday, August 20, 2018 if you want to take the class. That way, I can place the order with Stampin Up, and then create your class packets and get everything shipped to you. I will ship the class items to you the week of August 27, 2018. The total cost of this class is $59.45 for the bundle and ink pad (this is the exact cost from the catalog) plus $5 shipping for me to ship the products and class materials to you for a grand total of $64.45 If you would like to make any substitutions (for example, if you already own the Early Espresso ink pad and would like a different ink pad instead) or if you would like to add to your order, simply let me know that in the email you send signing up for the class. I will be doing a fourth "surprise" card in this class that will demonstrate coloring with our Stampin' Blend markers (which are alcohol markers). If you would like to add the following to your order, you will get the supplies for that fourth card as well: Light Smoky Slate marker, Dark Smoky Slate marker, color lifter marker. If you would like to utilize this option and add these three markers, your total will be $77.95 (including shipping). Make sure to let me know if you would like to utilize this option.
Also, don't forget, for the entire month of August, Stampin' Up is doing Bonus Days. For every $50 you spend, you get $5 in free money ("Bonus Bucks") to spend during the month of September. There is no limit to the number of Bonus Bucks you can receive. If you would like to add more to your order, just let me know in your email signing up for this class. Along with the products and class materials, you will also get access to an exclusive class video wherein I will teach you step by step how to create the six cards. I will also provide you with an instruction sheet which will show step by step how to create the six cards. You can also add to your order if you like, just email me what you'd like to add and I'll place the order for you once you PayPal me the cost of the order. **If you are already a demonstrator but you are interested in the videos for this class, for $15, you will get access to the video, the class materials and an email copy of the instruction sheet. Just send me an email at christinemriley@gmail.com if you would like to utilize this option. Thanks so much, I think you will really love this class!!! :) Hugs!
Hugs, Christine
Hi everyone! I have a new card and video tutorial to share today showing how I made this vintage looking card using Stampin' Up's Pop of Petals bundle as well as a few other stamp and die sets. Here are some pictures of my card:
To create this card, I first started off with a scrap piece of Very Vanilla cardstock. I stamped 4 flowers from the Pop of Petals stamp set with Powder Pink ink and two with Berry Burst ink. I put some dimensionals on the backs of all of the flowers and wound some metallic copper thread on the backs of the two Berry Burst flowers. Next, I decided to use the Stitched Seasons Framelits (which are only available for the month of August, and only while supplies lasts) to cut out the beautiful stitched shape out of Soft Sea Foam cardstock. I then stamped two leafy images from the Pop of Petals stamp set onto the Soft Sea Foam panel with Soft Sea Foam ink. I then used my Embossing Buddy and ran it over the Soft Sea Foam panel and then stamped the splotchy image, which comes from Stampin' Up's Touches of Texture stamp set, with Versamark ink and then sprinkled Copper Embossing Powder over it and heat the powder with my heat gun. I then adhered all of the flowers with dimensionals onto the Soft Sea Foam panel. Next, I took a small strip of Berry Burst cardstock and stamped the greeting "Thank You," from the Abstract Impressions stamp set, with Versamark ink and then embossed it with copper embossing powder. Next, I cut a piece of Berry Burst cardstock to 4" by 5 1/4" and ran it through my Big Shot with my Tufted Embossing Folder. I then adhered that to a Powder Pink card base measuring 11" by 4 1/4" scored at 5 1/2". I then adhered the Soft Sea Foam with dimensionals. Next, I added punched a banner end to my sentiment panel using my Banner Triple Punch. Next, I added dimensionals to the back of the sentiment panel and then wound some metallic copper thread around the back. I then adhered the sentiment panel to the front of the card base. I cut out two filigrees out of Copper Foil Paper for the bottom left and top right corner using the Stitched Season Framelits dies. I adhered them and then, for a finishing touch, I added some rhinestones for some bling. What do you think?
Well, that's it from me today. Thanks so much as always for stopping by. I'll link below to all the products used to create this card. Huge hugs!
Hugs,
Christine
Hi everyone! I'm so excited to introduce my next online class to you. The way my online classes will work is that if you decide you want to join the class, you will email me at christinemriley@gmail.com to sign up for the class. You will send payment via PayPal for the supplies (only the catalog items, in this case, the Healing Hugs stamp set and the Berry Burst, Mint Macaron, and Powder Pink ink pads). You will then receive from me for free with your order all of the supplies needed to create 6 cards, two each of three designs. You can see the free supplies you will be getting in the video above. I need you to please email me by noon EST on Monday, August 13, 2018 if you want to take the class. That way, I can place the order with Stampin Up, and then create your class packets and get everything shipped to you. I will ship the class items to you the week of August 20, 2018. The total cost of this class is $50.45 for the stamp set and ink pads (this is the exact cost from the catalog) plus $5 shipping for me to ship the products and class materials to you for a grand total of $55.45 If you would like to make any substitutions (for example, if you already own the Mint Macaron ink pad and would like a different ink pad instead) or if you would like to add to your order, simply let me know that in the email you send signing up for the class. Along with the products and class materials, you will also get access to an exclusive class video wherein I will teach you step by step how to create the six cards. I will also provide you with a PDF document which will show step by step how to create the six cards. You can also add to your order if you like, just email me what you'd like to add and I'll place the order for you once you PayPal me the cost of the order. **If you are already a demonstrator but you are interested in the videos for this class, for $15, you will get access to the video, the class materials and an email copy of the PDF file. Just send me an email at christinemriley@gmail.com if you would like to utilize this option. Thanks so much, I think you will really love this class!!! :) Hugs!
Hi stampers! Would you like a brand new copy of the 2018 Holiday Catalog mailed to you for free? Just send me an email (to christinemriley@gmail.com) and I'll get one right out to you. If you have ordered from me, no worries, you will receive a free catalog automatically :) This catalog is amazing, I can't wait for you guys to see it! :)
Hugs,
Christine
Hi everyone! My preorder from the 2018 Stampin' Up Holiday Catalog came today and I was so excited, I just had to make an unboxing/haul video for you guys.
In today's video, I share a bunch of new goodies I just received from my preorder from the Stampin' Up 2018 Holiday Catalog. You guys will be able to order from this catalog starting September 1st, but I wanted to share some goodies with you now so you can get excited :) If you have ordered from me (I started my business back up in June, 2018 so if you've ordered from me since then) you will automatically receive a catalog from me in the mail. If you have not yet ordered from me, but would like a catalog, please email me at christinemriley@gmail.com with "Holiday Catalog Request" in the subject line and just give me your mailing address and I'll send one right out :) Thanks so much as always for stopping by :) Hugs!
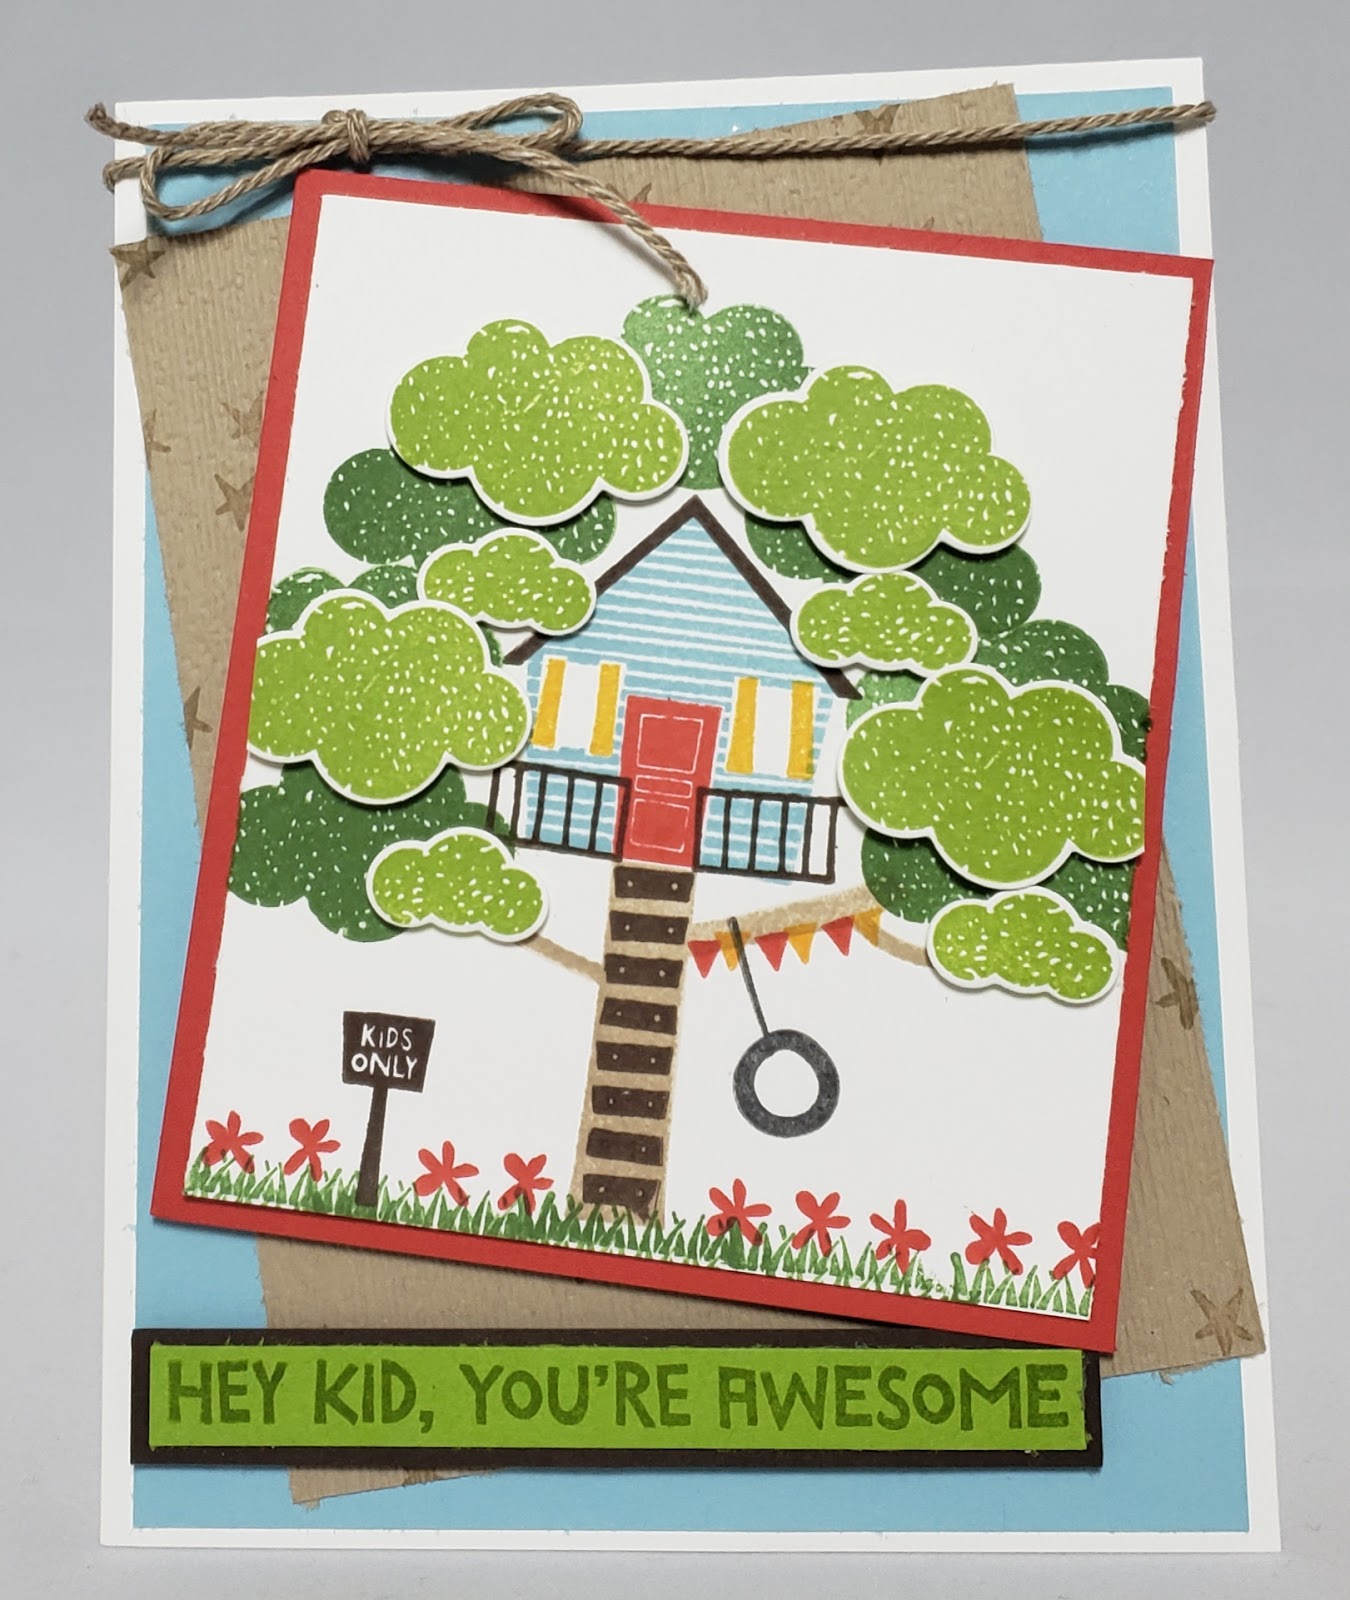
Hi everyone! For today's card, I just had to ink up the adorable Treehouse Adventure stamp set from Stampin' Up. This is a brand new stamp set which just came out with the release of the new Annual Catalog in June. I'm in love with this stamp set! I think it may be overwhelming, especially for a new stamper, to look at a set like this in the catalog and see it has so many parts. I'm hoping that once you see the card come together in today's video, you'll see it's super easy to use this set and I promise, anyone can do this!!! Here are some pictures of my card:
To create this card, I started with a piece of Whisper White cardstock cut at 3 1/4" by 3 3/4". This is the panel I did all of my stamping (except for the sentiment). I first stamped the tree trunk in Crumb Cake ink. Next, I stamped my house level with the top of the thick tree trunk in Balmy Blue ink. I next stamped the roof in Early Espresso. Next, I stamped the wood plank stairs leading up to the treehouse (so cute!) in Early Espresso ink. I next stamped my door in Poppy Parade ink and then stamped the shutters in Mango Melody. I stamped the porch in Early Espresso. I then created some grass along the bottom using Garden Green ink. I also used Garden Green ink to create the first, non-popped layer of green leafy tree around the tree and treehouse. I stamped the sign in Early Espresso, the tire swing in Tuxedo Black Memento Ink, and the flowers in Poppy Parade. I also stamped the little flag banner in Mango Melody and Poppy Parade. I then stamped the medium and small leafy tree parts (4 of each size) in Granny Apple Green ink onto a scrap piece of Whisper White cardstock and then cut them out with the coordinating dies in the Up & Away Thinlit Die set. I then popped them around my tree with dimensionals. I then adhered my Whisper White panel to a piece of Poppy Parade cardstock which measures 3 1//2" by 4". I then took a piece of Crumb Cake cardstock, cut at 3 1/2" by 4 3/4" and stamped the little star image from the set in Crumb Cake ink randomly over the cardstock panel. I then ran this through my Big Shot using the Subtle Textured Impressions Embossing Folder. I then cut a piece of Balmy Blue cardstock to 4" by 5 1/4" and adhered it to the front of an A2 sized notecard made from Thick Whisper White cardstock (measuring 4 1/4" by 11", scored at 5 1/2"). I adhered the Crumb Cake panel to the Balmy Blue at an angle and then adhered my treehouse panel with dimensionals at an opposite angle. I then grabbed a piece of Granny Apple Green cardstock (which measures 3 3/8" by 3/8") and stamped my sentiment in Granny Apple Green ink. I then layered a piece of Early Espresso cardstock behind it (which measures 3 5/8" by 5/8"). For a finishing touch, I added a bow to the top of the card using Crumb Cake Baker's Twine (which comes from the Nature's Twine pack. What do you think?
I just absolutely love this card and I hope you do too. Remember, Bonus Days are back!!! For the entire month of August, for every $50 you spend, you get $5 in Bonus Bucks, which you can redeem in the month of September (when the Holiday catalog is live!!!!) There is no limit to the amount of Bonus Bucks you can receive, so get shopping :) I'll link below all of the products used to create today's card. Thanks so much as always for stopping by! Huge Hugs!!!
Hugs,
Christine