buttons

Image Map

Tuesday, July 19, 2016

For You - Stampin' Up!'s Blooms and Wishes Stamp Set

Hi Stampers, and happy Tuesday! I hope you are all having a wonderful week. I have a super fun card to share with you today using two brand new stamp sets from Stampin' Up!


I love the new Blooms and Wishes stamp set from Stampin' Up! and I LOVE the new In Colors, so I decided to combine the two.  I did some two step stamping with the new stamp set, using Peekaboo Peach and Flirty Flamingo.  I created my own background paper using the new Playful Backgrounds stamp set.  For some fun, I added some glimmer paper and some rhinestones.  What do you think
Well, that's it from me today.  Thanks so much as always for stopping by.  Have a wonderful day!

Inky Hugs,

Christine

Monday, July 18, 2016

Super Simple Card Using Stampin' Up!'s Picture Perfect Stamp Set

Hi everyone and happy Monday!  I have a super simple and quick card to share with you today.


I love this rose from Stampin' Up!'s Picture Perfect stamp set.  It's so easy to use and the result is so pretty.  I used Pink Pirouette, Blushing Bride, and Rose Red ink.  The background was created using the Gorgeous Grunge.  I also used two pieces of glimmer paper, one gold, on in Blushing Bride, for the tags.  Super easy and super pretty! :)

That's it from me today, thanks so much as always for stopping by!

Inky Hugs,

Christine

Saturday, July 16, 2016

For You - Another Sneak Peek at Stampin' Up!'s Thoughtful Branches Bundle

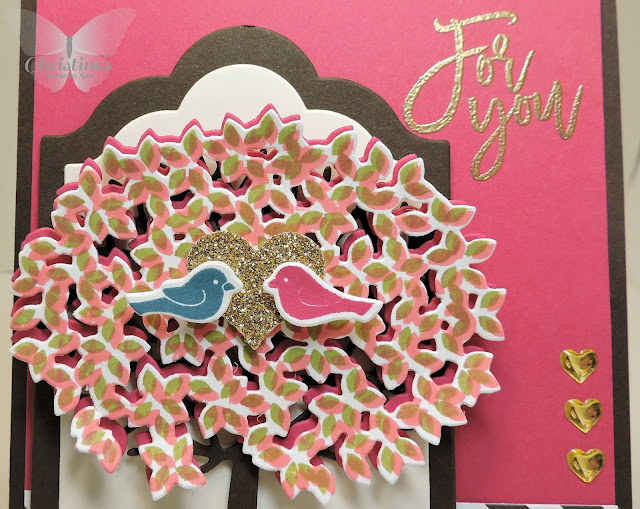
Hi everyone and Happy Saturday! I hope you are all having a wonderful weekend! We got up this morning and took the kiddos to Panera for breakfast and then to the park before it got super hot outside. Anyway, I can't seem to stop playing with the new Thoughtful Branches bundle from Stampin' Up! One of the perks of being a demo is getting to preorder awesome product and this stamp set and the coordinating thinlits are truly my current favorite goodies to play with. The possibilities are endless with this stamp set. It's truly amazing! Here's today's card:


How sweet is this card? I just love this set!  I first stamped the leaves in Pear Pizazz and then Flirty Flamingo overtop of it to give the multi-colors.  I then cut it out with the coordinating thinlit.  I then cut the same thinlit again in just Melon Mabo and hten adhered them together with dimensionals.  I then cut the tree out of Early Espreesso.  I layered it onto Very Vanilla cardstock, which I cut out using the Lots of Labels framelit.  I stamped the birds in Island Indigo and Melon Mambo and cut them out with the coordinating thinlits. The heart was cut out of Gold Glimmer paper using the Sweet and Sassy framelits.  The DSP is from the neutrals designer series paper.  I also added some gold glimmer paper to the bottom as well as gold foil.  I embossed the sentiment with gold embossing powder.  I also added some gold enamel hearts for a finishing touch.  What do you think?

Well, that's it from me today.  Have a fabulous weekend.  I'll link below all the products I used to create this card.  Remember, you can purchase this bundle for a limited time beginning August 2nd.  Thanks so much as always for stopping by!

Inky Hugs,

Christine

Friday, July 15, 2016

Thoughtful Branches - Exciting New Preorder From Stampin' Up!

Hi everyone and happy Friday!  We made it! :)  I'm so glad the weekend is here.  I am so excited to share my card with you today!  One of the many perks of being a demonstrator is that we get to preorder new products.  My card today features a brand new stamp set called Thoughtful Branches and a brand new coordinating die set called Beautiful Branches.  For a limited time, you can buy the stamp set, the die set, or both as a bundle, beginning August 1st.  Here's my card:


How wonderful is this?!?!  I just LOVE this stamp set.  You can create projects for all seasons and the coordinating dies really make your projects pop!  For my card, I stamped the leaves in Pear Pizzazz and then lightly used the thumping technique with my Melon Mambo marker to add some color to the leaves.  I then cut the leaves and the tree out with the coordinating dies.  I then cut the leaves out again in Flirty Flamingo to back behind the stamped leaves.  I added some linen thread and some pearls and then stamped the sentiment in Flirty Flamingo.  I just LOVE this set and you will too, I promise!  Here's the set and the dies:


Well, that's it from me today.  Thanks so much as always for stopping by.  I will link for you below all the products I used to create this card.  Have a wonderful day! :)

Inky Hugs,

Christine

Thursday, July 14, 2016

Thankful For You Card Using Stampin' Up!'s Sheltering Tree Stamp Set

Hi stampers!!! :)  Happy Thursday!  One more day and then the weekend, yay! :)  I have a super simple, but super fun card to share with you today.  I almost always use this stamp set as one of the projects I teach at workshops.  It's so easy to use and the results are gorgeous.


How pretty is this?  And this literally takes less than 5 minutes to make.  To create the grass, I used the "stamp off" technique.  Some were stamped with full strength Garden Green ink and others were stamped first on scrap paper, then onto the card.  I made the tree muticolor by stamping the large portion of the tree in Blushing Bride and then I used the small stamp (which also coordinates as flowers for the grass) and stamped that several times in Melon Mambo.  Super easy and super fun. 

Well, that's it from me today.  Thanks so much as always for stopping by.  I'll link below all the products I used to create this fun card.  Have a great day! :)

Inky Hugs,

Christine


Tuesday, July 12, 2016

Video Tutorial - Two Step Stamping with Stampin' Up!'s Baby Bear Stamp Set

Hi everyone!  I have a new card and video tutorial to share with you today.  I love the new Baby Bear stamp set from Stampin' Up!  I love the two step (or in this case, three step) stamping technique, I really feel like an artist when I use this technique and Stampin' Up! makes it so easy!  Here's my card:


How adorable is that sweet teddy bear?  I made this a baby card, but you could give this for any occasion.  I did a video tutorial for you, showing how I created this card and how the two step stamping works.  Here's my video:


I hope you found this helpful!  I will link below all the items I used to create this card.  Thanks so much as always for stopping by! :)

Inky Hugs,

Christine

Monday, July 11, 2016

Live, Laugh, Love - Super Simple Stampin' Up Wow Card

Hi everyone and Happy Monday!  I hope you all had a wonderful weekend!  I had a Stampin' Up workshop this weekend and had so much fun!  This is one of the cards I demonstrated to the group.  It's so super easy, it took about 5 minutes to create this card, but it really has that "wow" factor.  I love it!  Here it is:


So super fun, the glitter paper, thick Melon Mambo baker's twine, silver metallic thread, and the enamel dots really add something extra I think.  Super fun! 

I'll link for you below all the supplies I used to make this fun card.  Thanks so much as always for stopping by!

Inky Hugs,

Christine